Translate

Thursday, February 28, 2013

Elevation Polish Brown Jelly Trio Swatches and nail art

Hi
Summer is coming around the corner, and for me that means a lot of water holes and a lot of hiking. I plan to take a lot of trips all over California and explore and find all the great water holes out there ( Im super excited). When I got these polishes I thought "wow these scream earth!. The best part of it all is they are jellies, and I love jellies.

They are from Elevation polish and come in a three pack for $20 or sold separately. These color are very high in demand and have been sold out since the last restock. There will only be one more restock on March 7 at 9pm CST. I missed out the first time ( I was in the shower at 7 and they sold out in less then 20 minutes) The second time around I made sure I kept refreshing the page until I was able to stick them in my cart. So if you do like them make sure to keep time open to purchase quick.

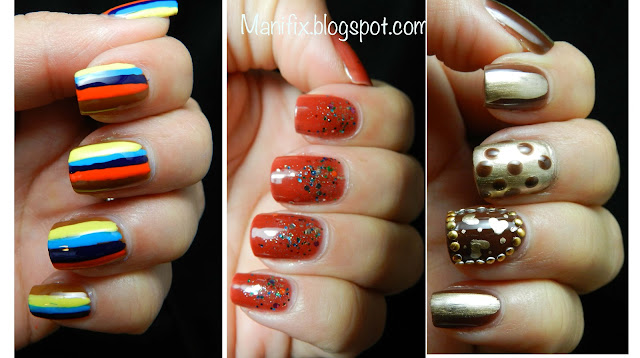
The first one is called Tettegouche, inspired by the creators favorite hiking spot in Minnesota. It is a dark coffee brown. This is my favorite of the trio, can we say yummy brown!  As you will see below, it pairs nicely with gold. Three coats where needed to achieve coverage.

This is Cascade, a brick red with a bit of brown in it. Not a ordinary jelly, I think it unique in its variation. Three coats needs for this.

This is Temperance, a rich caramel brown. I paired this with bright colors and thought I was looking at a painting. Three coats where needed.

I tried to vary the nail art and have a little bit of everything. I think my favorite is Temperance with the bright colors, the caramel made the other colors pop out and it was a great canvas. The studs used in the third picture are from Born pretty store, a review of the sample will come soon.


Pin It
Well I don't know about you guys but I got jelly wasted after wearing these for three days. They have a great formula. After wearing each with topcoat I am pleased to say there was no chipping, yeay for them!
So will you take the change and purchase these? Remember next week March 7 is the last restock, and then who know when they will be back.
Thank for reading Enjoy!



Tuesday, February 26, 2013

Life is Rosy China Glaze Avant Garden Nail Art

Hi
Today I have made some simple art using some of the colors from China Glaze Avant Garden Collection. These are some beautiful colors for spring. Lately I have been doing so many winter art , now I am winter wasted... NO MORE COLD, PLEASE BRING ON THE WARMTH!!!!.. Sorry someone had to say it. This is my official first spring mani so I hope you enjoy.


Pin It
As my base I used Life is Rosy, a nice rosy mauve, perfect for those nice summer dresses we all have hidden in our closets. I used two coats and application was great.

Using an art brush and dotter I painted on some different style of flowers using, fancy pants, a purples/blue color with some pink shimmer, Life is Rosy, and Passion for petals,  a creme between red and a little pink tone.

I thought is would be nice to add topcoat and make it look like a painting.. I love the matte look. Which do you like better?
Thanks for reading. Enjoy


Saturday, February 23, 2013

Let it Snow Challenge Winter Ombre/Gradient

Hi
This weeks them is Winter Ombre/Gradient... Here at the Nail Challenge Collaboration we are almost done with our challenge and getting ready for a new one so stay tuned. I do a lot of gradients in my art because they are simple and easy. For this I wanted to use My KB shimmer Hex Appeal, with white bottom.


Pin It
This reminds me of a winter night with a snowy bottom. Hex Appeal is a great color for this effect. The dark blue creates a great opposite to the bright white, and the glitters that float in the blue make it look like a starry night.


All this winter art is giving me the winter blues...but wait that's next weeks mani!
Enjoy!


Thursday, February 21, 2013

Nails Inc Leather Effect Swatch

Hi guys! So this is a super fun post for me, I finally get to use my Nails Inc Leather Effect Kit I got for Valentines Day. That's right guys, all I wanted for Valentines day was nail polish! This polish starts out Glossy but then slowly dries to a leather effect. This polish is not bumpy and feels like a soft nail file. I'm very aware of what is on my body ( when I wear contacts I can feel them in my eyes the whole day) and I was very aware of this polish all day. But is was not unpleasant. I love the effect it makes and it is very unique from anything I own.

Here I used the studs and the skull that come with the pack. I used the glue that comes in the pack to glue all the studs and skulls. The studs are very durable and I bet the skulls would have stayed longer on my ring finger if I wasn't running around and picking up kids all day. Not something I will wear on a weekday when I'm working with my little clients.
Pin It

I swatched the polish by itself. Two coats, waiting two minutes or so between coats.
This polish is great for a TOP coat for nail art. I would not recommend it for a base. I tried to make white lines 15 minute after application and its smudged together, not cute. I then applied a base of Sally Hansen White on, used tape to make the diamonds and added black. It worked out better this way, clean lines and no smudges.

This is what you get in the back. On the nails inc website you only get the skulls. My Fiance bought this at sephora for $25 and you get crystals and studs along with the skulls. The crystals are Swarovski crystals so quality is great.

This is what is looks like without the skull. I didn't use all the items in the kit. I didn't want to much on my nails, the polish adds enough effect as it is. I will add that the studs would occasionally get stuck in my hair, but no other problems beyond that.

So what do you think? With all the new textures out there, is this something you would add to your collection.
Enjoy!


Tuesday, February 19, 2013

Flowers using LynBDesigns nail polish

Hi Everyone
So today I have a swatch and nail art. I recently purchased some nail polish from LynBDesigns. I say a review on Sacre Blurple and I had to get it. I love jelly polishes and my mission is to have one in every color. They are so beautiful and have so many qualities under different lights. Sacre Blurple is no exception.  Keep reading for sale at end.
Pin It
 This color is a deep blue/ purple polish. I got it opaque in two coats yet some might need three. I love this color it is so rich and deep.

As you can see it really makes the white art really pop out. I made the flowers using my dotting tool and Sally Hansen White on. I like using my dotting tool for nail art more then a brush because I have better control of what I am doing. On my accent finger I used glequins from Born pretty store
This blue is one of my favorites.
You can purchase this polish on LynBDesings on etsy store. Right now there is a sale of 50% of for the  next week.
Also you can like LynBdesings on Facebook. She's been having a lot of cool giveaways so tune in.
Thanks for reading!


Monday, February 18, 2013

Let it snow Challenge Winter wonderland

Hi
I dont know about you guys but Im sick of being cold. I live in California and I am tired of nice days here and freakishly cold day the next. For this post I really wasn't to inspired but when I think of winter wonderland I think of dark blue and white everywhere, so here it is.


Pin It
I used OPI Swimsuit.. Nailed it and Zoya Ginessa . To mix the two colors I used the fan brush method. Super easy method to create nice mixture of color.

Well I don't know about you guys but Im definitely ready for the roses to start growing again.
Please check out the other ladies.


Sunday, February 17, 2013

Pokemon Nail Challenge Bug Pokemon

Hi
Im running a bit late on my post for this, but better late then never. For bug week I choose Caterpie. Such a cute little thing yet can pack a punch ;)
I decided to give him a blank canvas since his body is a great long creation itself.
Enjoy!


Thursday, February 14, 2013

My Valentines Mani Using China Glaze

Hi Guys!
Happy Valentines Day! Today Im going to give lots of hugs to my mom, my lil clients, my brother and of course my lovely Fiance. For me Valentine Day is giving love to everyone. Last year I showed all my love to mom, and bought my now fiance some candy.
Any way this years mani is very different from any I have done. If you look back at my other posts you will notice I have done a lot of pinks and reds, and so on. So for  today I wanted to try something different and cool. With this mani I feel like Frida Kahlo came and gave me inspiration. I love it.

Pin It
I like the keys I made on my thumb. One is for my mother and the other is for my fiancé. They hold the keys to my heart :) ( today I can be cheesy right!)
All was done with a small art brush and dotting tool. 
Base coat used is China glaze liquid leather.


Happy Valentines Day everyone. Love and respect all who are special to you each and everyday.
 Thank you for reading my blog.  

Have a wonderful day!


Tuesday, February 12, 2013

10 Days of Valentines Day 10 Gold gradient

Hi
Last day of 10 Days of Valentines Day. Glitter gradients are always fun to do and they bring so much attention to your nails. Also it's great for those of you who aren't big glitter fans, but want a little sparkle.

Time: 20 minutes.

Nail polish used
Red: OPI 20 Candles on my cake
Gold: China Glaze Champagne Kisses

ON THE 10TH DAY OF VALENTINES DAY MY TRUE LOVE SENT TO ME.... JEWELRY..YES!


Pin It


This was another easy mani for those of you who don't have have much time to paint your nails, but still want to look good.
Enjoy!


Monday, February 11, 2013

10 Days of Valetine Day 9 Red strawberry tutorial

Hi
This is a very quick mani.It works for those of you who don't to even spend 20 minutes on a mani. It has very simple nail art, nothing to challenging.

Time : 15 minutes

Polishes used:
Red: Essie Russian roulette
Brown" Suze love cowboys
White: Sally Hansen White on

ON THE 9TH DAY OF VALENTINES DAY MY TRUE LOVE SENT TO ME ....CHOCOLATE COVERED STRAWBERRIES!


Pin It


This  is a super simple mani and the red is great.
Enjoy


Friday, February 8, 2013

10 Days of Valentine Day 8 Black and white tutori

Hi all
Todays mani has to be one of my favorites so far, it doesn't scream Vday, but it is very feminine, and again it's for those of you who don't care for Valentines Day. This would go great with that little black dress too.

Mani Time: 20 minutes (yeay!)

Nail Polish used
Black : Wet n Wild Ebony Hated Chris
I tried to make these mani simple and easy, as well as economical. The black I used is Wet n Wild Ebony hates Chris. This polish is non expensive and can be found anywhere. It is streaky and takes about two coats to cover ( my china glaze only needs one). For nail art it not the best because even though it say fast dry, it still streaks when you add a topcoat. If you are not willing to invest in more expensive nail polishes, it is always a good idea to invest in a good top coat such as Seche Vite. It helps to prevent streaking, I have used others and the only one I stick to is Seche Vite. Also the polish is not very shiny on its own, the topcoat made it much better and makes it last longer. I used this because like I said it's a basic black, I dont want to spend a lot on a basic black, and my topcoat saves me from disaster.

White
Sally Hansen Xtreme Wear : White on
Great polish and not very expensive, dry time is great and it's great for nail art.

Glitter
Sally Hansen Gem Crush: Big Money

Pin It
After the hearts do a glitter gradient on the other nails. Check out this tutorial made by Lissapolishaddiction. It's a great video to check out. 


I simply loved it.. I might just do this for my Vday mani it's so simple and yet so cute.
Enjoy!

10 Days of Valentine Day 7 Purple mani tutorial

Hi
This mani is for those of you who are not into red and pink, but still need something feminine and fun. simple Mani: 20 minutes Final Mani 25 Minutes Colors used All colors used are part of the OPI Germany Collection Purple: OPI Suzi and the 7 Dusseldorfs Nude :Don't Pretzel my buttons. White: Sally Hansen White on
Pin It
To paint the hearts I used my biggest dotting tool. Sometimes using brushes can be difficult, dotting tools are much easier to handle.
If you have rhinestones available you can add four around the hearts and add topcoat.
I purchased these at Born pretty store.
I added topcoat to the purple bare nails only.


Purple isn't my favorite color, so I thought it would be appropriate for those of you who would rather not go red and pink.
Enjoy